

User Guide#
This page explain how users can build deployable artifacts for the majority of the Vera Rubin Observatory control software. This package focuses on those components that are deployed as docker containers, either as simulators and/or to control real hardware.
The observatory control software build system makes use of the concept of cycle and revision.
- Cycle
Tracks the versions of a group of core packages that affect all components.
- Revision
Tracks the versions of all the other packages in the system.
Anytime a version of a core package changes a new cycle must be created. Every new cycle starts with revision 0. If the version of an individual package or dependency library changed, outside of the core packages, a new revision is created. The build is then tagged accordingly;
c<cycle-number>.<revision>
The resulting docker images are tagged similarly.
For instance, the image for the MTMount component for cycle 14, revision 3, will receive the name:
ts-dockerhub.lsst.org/mtmount:c0014.003
The first part of the name is the nexus docker registry where we store the deployable artifacts, the second is the name of the image followed by the tag.
In addition, for each cycle the latest revision is tagged with the cycle only, e.g.;
ts-dockerhub.lsst.org/mtmount:c0014
This allows for easily switching back and forth between revisions of a single cycle.
All images are annotated with the version information about the installed packages so one can easily inspect the content by doing:
docker image inspect -f {{.Config.Labels}} ts-dockerhub.lsst.org/mtmount:c<cycle-number>.<revision>
Core packages#
The following is a list of the core packages that are used to define a particular cycle.
ts_ddsconfig: Contains DDS Quality of Service (QoS) configuration and various sanctioned OpenSplice configuration options for running systems in shared memory, single process and unit testing.
ts_xml: Contains the definition of the interfaces of all components in the system.
ts_sal: Contains the core DDS communication middleware layer.
ts_idl: Contains ancillary files used by ts_salobj and other higher level applications.
ts_salobj: High-level Python library to develop CSCs and SAL Script.
Creating a New Cycle or Revision#
In general, it is expected that new cycle builds shall be deployed in one of the integration test stands to be tested before rolling to production (e.g. summit). Because the validation process can take some time and since summit environment is in constant need for updates (new revisions), a new cycle can only be considered officially released after the production rollout.
To deal with this process in a more comprehensive way, this repository uses a different development workflow than the one adopted by TSSW in general.
In the following sections we detail the adopted development workflow and present the procedures to perform both a new cycle as well as new revisions for a cycle.
Workflow#
The following is a general description of the (branch) workflow adopted by ts_cycle_build. Although it references the creation of revisions and cycles, it is not to be taken as the procedure itself. For the detailed procedures, see Building a new Cycle and Building a New Revision below.
For the cycle build we adopt
main(instead ofdevelop) as the “default” branch. This branch tracks what is running in the production environment.To start a new cycle, users must create a new branch that, initially, tracks the
mainbranch. The branch must be namedcycle/####. For instance, when starting cycle 21, users will create a branchcycle/0021that tracksmainat the time.This branch should not receive any direct commits. Instead, users should create “ticket branches”, with the name of the ticket they are working on. Note that the repository is setup so all
cycle/*branches are automatically protected against direct commits.For instance, if the ticket you created to track the work to build cycle 21 is
DM-12345, you will create atickets/DM-12345branch, based on thecycle/0021branch, to work with.Once the work is completed, a PR must be issued to merge
tickets/DM-12345tocycle/0021.Attention
Make sure you select the correct cycle branch when opening a PR. By default GitHub will assign the
mainbranch as a target to all PRs. You must manually select the cycle branch on this occasion.If new revisions to the current cycle (say cycle 20) are needed to support the production environment, ticket branches out of
mainshould be created and PRs must be opened and merged back tomain, as usual.If new revisions to the new cycle are needed before the new cycle is officially released, ticket branches out of the new cycle branch should be created (e.g.
cycle/0021) and PRs must be opened and merged back to the cycle branch.As long as the new revision has not been release, the revision number should not be increased. It is perfectly OK to combine the changes to several tickets in a single revision if necessary.
Once the new cycle is deployed at the summit and certified, a PR should be opened to merge the cycle branch back to
main.The methodology is as follows:
Create a new branch out of the new cycle branch (e.g.
cycle/0021) pre-pendingrelease/to the name (e.g.release/cycle/0021). Rebase thereleasebranch tomainand open a PR to merge thereleasebranch tomain. Thecyclebranch will remain unchanged until the official rollout is completed, to keep a momentary record of the cycle history.Once the PR is merged, the
mainbranch receives a tag with the cycle and revision number (cycle.revision, e.g.c0021.000).At this point the cycle branch (e.g.
cycle/0021) should be deleted to avoid confusion when opening ticket branches for cycle revisions.From this point on, new PRs will be made directly to
main, until a new cycle is created.
Building a New Revision#
Building a new revision means updating one or more packages that are not part of the Core packages.
The procedure is as follows:
Start by cloning/updating the
ts_cycle_buildrepository.If you do not have a local copy of the repository, clone it with:
git clone https://github.com/lsst-ts/ts_cycle_build.gitYou may need to use the ssh version if you have two factor authentication (which you probably should). In this case, do:
git clone git@github.com:lsst-ts/ts_cycle_build.gitTo update a local existing copy do;
cd ts_cycle_build/  # Update the path to match the location of the package in your environment
git checkout main
git pull
Check if a revision is already open or not.
You can check the repository git history to see if there are any ticket branches already opened or contact people on the ts-build slack channel slack channel and ask about any opened revisions.
Important
We want to avoid, as much as possible, to have more than one revision open at any time. Therefore, it is paramount that you coordinate any work done with the build team.
If a revision exists, checkout the revision branch:
git fetch --all
git checkout tickets/DM-12345  # existing revision branch
If not, create a new revision branch:
git checkout -b tickets/DM-12345 # create new branch to work onOpen the
cycle/cycle.envfile and update the revision number at the top.Important
For now, we do not have any protection against reusing an existing cycle revision so make sure you increment this number before anything else.
Eventually this will be enforced by the build system.
Update the version of any package you need in
cycle/cycle.env.Commit and push your changes.
At this stage, make sure you are not rebasing or overwriting the git history. In general, the commits should only be cleaned up once the revision is ready to be closed.
If you are building an existing revision, just do
git pushIf this is a new branch you may have to do the following the first time you push, to setup the remote branch:
git push --set-upstream origin tickets/DM-12345 # update branch name to match your local branchAfter pushing your changes to your branch you can build the components you want to update.
The build is entirely handled by the Telescope and Site Software Jenkins server.
Once the changes are pushed to GitHub the branch will appear in the cycle build jenkins job. Select the branch you are working on in the Branch tab and select
Build with Parameterson the left-hand side, which will take you to the Jenkins build with parameters page showing how to build the ATSpectrograph CSC, which is part of the base components..If you just created the branch (e.g. you are working on a brand new revision, instead of an existing one), you may see a
Buildlink instead ofBuild with Parameters. If this is the case, click onBuild, wait for a build to start and then reload the page. This will cause Jenkins to perform a “dry run” and update the build page.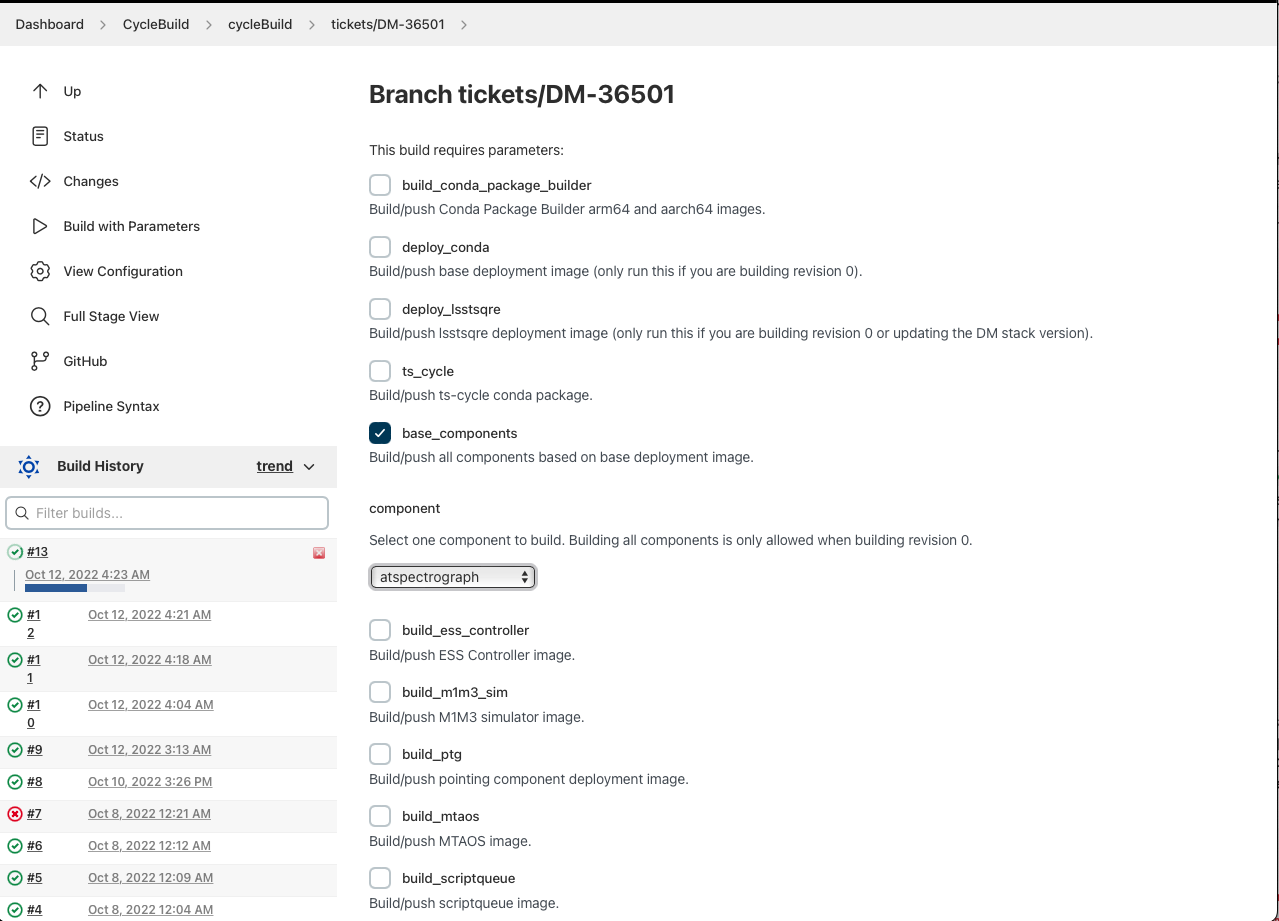
Jenkins build with parameters page showing how to build the ATSpectrograph CSC, which is part of the base components.#
If the component you want to build is part of the base components, select “base_components”, then select the component you want to build in the dropdown menu, and press the “Build” button at the bottom of the page.
When building a revision it is not possible to build “ALL” the components.
Animated gif showing how to build a base component.#
If you are updating the DM stack version (entries
lsstsqreandstackin thecycle/cycle.envfile), you first need to build thedeploy_lsstsqre, then you can build the images that depends on it, most commonlybuild_scriptqueue. Beware that both these images takes quite some time to build (about 40 minutes each).If your component is not part of the “base_components”, check if it is available as one of the individual selectable options. If so, select it and press the “Build” button at the bottom of the page. If not, your component might not be part of the cycle build yet. In this case contact someone on the build team to included it in the build system, instructions are available in Adding New Components.
Once the build completes successfully, you can deploy it at one of the test stands or on the production environment using argo-cd.
The procedure is detailed here.
After you are done with your changes with the revision, you can open a PR to merge your ticket branch to the
mainbranch.Before opening a PR, make sure you squash all the changes to
cycle/cycle.envinto a single commit. That single commit message should have the following format:“Update version of the following packages:”
Followed by a list of the updated packages.
Also, make sure you update the
doc/version-history.rstfile with all the changes done.Finally, make sure you coordinate closing the revision with the build team.

Building a new Cycle#
A new cycle means updating the Core packages alongside all other updates required. This is a long process and is usually done by a member of the build team.
The procedure is as follows:
Create a ticket branch from
main:git fetch --all git checkout main git pull git checkout -b tickets/DM-12345 git push --set-upstream origin tickets/DM-12345
Open a Slack thread on the
ts-buildchannel with the following message “Cycle XXXX :thread:”.Open the
cycle/cycle.envfile and update the cycle number at the top and set the revision number to zero.Important
For now we do not have any protection against reusing an existing cycle so make sure you update this number before anything else.
Eventually this will be enforced by the build system.
Update the versions of core packages in
cycle/cycle.env.The vanward package was designed to help prepare for new cycle updates.
Commit and push your changes.
git push
Build the Conda Package Builder images, this is stage 1 of the Jenkins pipeline
Build the deploy-conda image
Build the deploy-lsstsqre image, alert Michael Reuter when this stage is complete.
Important
If one of the images fail, check that the ts-idl has been built.
You have now built the core package images and can move onto the product images.
Build the ts-cycle package.
Build all of the products.
Important
Products that are tagged may not be built due to being tagged before a core package was released. Another reason might be that the job is not configured to build tags automatically. The solution to solve those problems is to either run or re-run the job.
Build the ESS controller.
Build the genericcamera specific images.
Build the m1m3_sim.
Note
The M1M3 sim uses C++.
Build the ptg component.
Note
The Pointing component uses C++.
Build the scriptqueue.
Build the mtaos.
Build the pre-nubalado Sal Sciplat image.
Build the nublado Sal sciplat image.
Build the RubinTV Broadcaster.
Important
This image relies on the previous two images being built successfully.
Build the develop-env image.
Important
Continue the build process even if any of these parts fail, alert the appropriate people or let members of the build team know in the thread.
Once this is done, everything should be ready for deployment on the Test Stands. During deployment people will likely be updating products with new versions. Make sure to remind them to use the thread to alert people that work is being done.
If a product needs to be updated and built, make sure to select the product from the drop down and check the build products box.
The criteria for closing a cycle is the following
Deployment on the summit is done and there are no updates outstanding.
Once criteria has been met, then you can create a cycle branch and open a pr from the ticket branch.
gh pr create -f -B cycle/00xx
Then sanitize the commit history with the following criteria
Squash commits that change cycle.env into one commit with the following message template
Cycle xx
Core Packages
core_package -> x.y.z
Products product_name -> x.y.z
Keep the build changes discrete.
Update the version history at the end.
Once the PR is approved, go ahead and merge into the cycle branch. Once merged, close the slack thread.
It is important to follow the build steps order. If a build fails, alert someone that is responsible and continue forward. Also, we recommend running one step at a time in the Jenkins server, to make sure the image is pushed correctly, avoiding a potential push problem at the end.
The build should always start with the base images;
build_conda_package_builder,deploy_condaanddeploy_lsstsqre. First build thebuild_conda_package_builderimages and update the thread with result. Then builddeploy_condaand update the thread with result. And then builddeploy_lsstsqreand update the thread with result. Finally, if bothdeploy_condaanddeploy_lsstsqreare successful, alert Michael for downstream usage.Note
The most common issue in building the base images is that the core conda packages are not built yet. Most notably, the
ts-idlpackage.It is, in general, required to run the build manually by going to the ts-idl conda package job in Jenkins, selecting the version of
ts-idlto build in the “Tags” tab and building it with the appropriate version ofts-xmlandts-sal. Note that this build may also fail if the RPM artifacts are missing. In this case, contact the build team in the ts-build slack channel.Once both base images are built the system is ready to build the remaining components. The first thing to do is to build the ts-cycle conda package. This package depends on the core packages and can be built after the core packages are built. Next, given the simplicity and overall time it takes to complete, it is advisable to build the
base_componentsnext. This step will build the majority of the products.Note
One of the most common issues in building this step is when the selected version of the conda package for a component (or library) is not available. In this case, make sure to check the conda Jenkins build for the particular package. Also a build may not run automatically even if a tag is released. On some occasions developers release the code before all required dependencies are available (in most cases the idl package) and the release build fails. For most cases, rerunning the build in Jenkins (after making sure the dependencies are available) should be enough to fix the problem. If further issues are encountered with the build for that particular package you can either attempt to fix it yourself (most cases are simple pep8 or black formatting issues) or contact the developer in charge of the component and request a patch.
Once the
base_componentsare built successfully the natural next phase is to build theESS ControllerDocker image, theMTM1M3simulator and the pointing component,build_mtm1m3_simandbuild_ptg, respectively. These are both C++ components built using thedeploy_condabase image. In both cases, the SAL libraries are installed using the rpm packages from the nexus server and the components are compiled at build time.Note
Sometimes it will happen that the RPM package with the library is not available for these components. This happens mostly when we update the version of OpenSplice. If this is the case contact the build team in the ts-build slack channel.
Note
We do have plans to change how these components are built in the future. The idea is to either build them as conda packages or RPMs. Since the pointing component contains private software and M1M3 is ultimately deployed in an embedded system, it is more likely that RPMs will be used.
The next natural step is then to build the
ScriptQueuecontainer via thebuild_scriptqueuejob. This image uses thedeploy_lsstsqreas a base image and useseupsto install and build the dependencies for theScriptQueue, which means the step will take some time to finish.Next, proceed to build the
MTAOScomponent, which is also built on top ofdeploy_lsstsqre, due to its dependency on the DM stack.Then, build the two nublado images,
build_salplatfirst and thenbuild_sciplat_lab_recommended, since the latter depends on the former to build.Finally, build the
RubinTV Broadcaster. For more info, see here.With this, all systems are ready to be deployed.
Once deployment is done on the summit. Create the cycle branch and open a PR to it using the ticket branch.
Build Steps#
The build is divided into steps to start from building base images up to deployable component images. These steps are designed to maximize reusability of docker layers, minimizing the number of layers in the image and reducing the time it takes to build the system. The steps in the build are as follows:
build_conda_package_builder: Build Conda Package Builder arm64 and aarch64 images, these stages are split but should be together.
deploy_conda: Build base image used by all conda-installable components.
deploy_lsstsqre: Build base image used by components that require the DM stack.
ts_cycle: Build the ts-cycle conda package.
base_components: Build either ALL or an individual component from conda packages. This includes the following components:
ataos
atdome
atdometrajectory
athexapod
atmcs
atpneumatics
atspectrograph
authorize
dimm
dmocps
dsm
ess
fiberspectrograph
genericcamera
hvac
lasertracker
love-commander
love-csc
love-frontend
love-manager
love-manager-static
love-producer
m1m3_sim
mthexapod
mtdome
mtdometrajectory
mtm2
mtmount
mtrotator
ospl-daemon
pmd
scheduler
watcher
weatherforecast
build_ess_controller: Build ESS Controller Docker image.
build_camspec_gencam: Build/push camera-specific GenericCamera images.
build_m1m3_sim: Build M1M3 simulator.
build_ptg: Build pointing component. Both AT and MT use the same code base and image.
build_mtaos: Build MTAOS.
build_scriptqueue: Build ScriptQueue. Both AT and MT use the same code base and image.
build_salplat: Build base pre-nublado image. This adds the Telescope and Site base layer to a base DM image needed for nublado.
build_sciplat_lab_recommended: Builds nublado images. Adds the final layer on the nublado images, needed to make them compatible with nublado system.
rubintv_broadcaster: Builds RubinTV broadcaster. Backend for RubinTV, a service that provides rapid image analysis for the LSST Auxiliary Telescope
develop_env: Build/push development image.
The Development Environment#
The docker development environment is used is (now) part of the cycle build.
This docker image is built on top of the DM stack image (lsstsqre/centos) and contains all (or most) of the software needed for developing software for Telescope and Site stack.
The image also ships with the basic Telescope and Site software needed to develop components and SAL Scripts for the ScriptQueue.
New packages can be added to the development environment by request.
In some cases, adding new dependencies may require some discussion and agreement with team members and acceptance by the Software Architect.
There are mainly three different types of development environment images; main, develop and release cycle/revision tags.
The first two tags, main and develop, are updated daily with the lsstsqre/centos:w_latest base image and all the Telescope and Site software using main and develop branches, respectively.
This process helps guard the system against potential breakages introduced by changes in any of the packages that are part of the image.
The cycle and revision tag images are built from the versions specified in cycle/cycle.env.
They represent a frozen set of the system where all packages are built from tags.
For more information see Creating a New Cycle or Revision.
To pull one of these images simply do;
docker pull lsstts/develop-env:<tag>
Where tag can either be main, develop or <cycle>.<rev>.
You can check the latest cycle/revision here.
Once the image has been pulled you can verify the version of all the Telescope and Site software in the image by inspecting the image labels. The command is;
docker inspect -f '{{ range $k, $v := .Config.Labels -}} {{ $k }}={{ $v }} {{ end -}}' lsstts/develop-env:<tag>
For main and develop all packages will have labels main and develop, respectively, whereas cycle/revision images will show the packages tags.
In addition to the Telescope and Site software, the development image also ships with a number of packages used for development, for instance, pytest, pytest-asyncio, pytest-black and many others.
There are mainly three categories of software provided with the image, yum, conda and pypi packages.
The list of yum packages available in the image are:
dos2unix
emacs
epel-release
gdb
git
gnome-terminal
graphviz*
ifconfig
java-1.8.0-openjdk-devel
libgphoto2-devel
ltrac
mariadb
mariadb-devel
maven
nano
ncurses-libs
net-tools
ntp
strace
swig
tcpdump
tk
tk-devel
tzdata
unzip
wget
which
xorg-x11-fonts-misc
xterm
In addition, OpenSpliceDDS is also installed using yum from our nexus repo.
This library provides the DDS communication middleware, which is the core of all Telescope and Site software.
The public image (available in the lsstts docker hub channel), ships with the 6.9.0 community edition version of the library built for el7, to be compatible with the conda environment of the base lsstsqre/centos image.
Note
We have plans to provide a version of this container with the licensed edition of the OpenSpliceDDS library from our private docker registry (ts-dockerhub.lsst.org).
Furthermore, the conda packages available in the image are managed through the ts-develop conda metapackage.
The list of packages are:
aiokafka
astroquery
asynctest
black ==19.10b0
boto3
ephem
fontconfig
ginga
gitpython
ipdb
ipympl
jinja2
jsonschema
jupyter
kafkacat
lxml
moto
pre-commit
pycodestyle
pyqt
pytest
pytest-asyncio
pytest-black
pytest-cov
pytest-flake8
pytest-subtests
pytest-tornasync
pyyaml
setuptools
setuptools_scm
sqlalchemy
wget
Some dependencies that are not available through conda are added with pypi:
aiomisc
aiounittest
confluent_kafka
documenteer[pipelines]==0.5.8
kafkit[aiohttp]
ltd-conveyor
pyevents
Finally, the list of Telescope and Site software that are eups installed are:
ts_atdome
ts_atdometrajectory
ts_atmcs
ts_config_atcalsys
ts_config_attcs
ts_config_eas
ts_config_latiss
ts_config_mtcalsys
ts_config_mttcs
ts_config_ocs
ts_externalscripts
ts_hexrotcomm
ts_idl
ts_observatory_control
ts_sal
ts_salobj
ts_scriptqueue
ts_simactuators
ts_standardscripts
ts_auxtel_standardscripts
ts_maintel_standardscripts
ts_tcpip
ts_xml